Customize Consent Preferences

We use cookies to help you navigate efficiently and perform certain functions. You will find detailed information about all cookies under each consent category below.

The cookies that are categorized as "Necessary" are stored on your browser as they are essential for enabling the basic functionalities of the site. ... 

Always Active

Necessary cookies are required to enable the basic features of this site, such as providing secure log-in or adjusting your consent preferences. These cookies do not store any personally identifiable data.

No cookies to display.

Functional cookies help perform certain functionalities like sharing the content of the website on social media platforms, collecting feedback, and other third-party features.

No cookies to display.

Analytical cookies are used to understand how visitors interact with the website. These cookies help provide information on metrics such as the number of visitors, bounce rate, traffic source, etc.

No cookies to display.

Performance cookies are used to understand and analyze the key performance indexes of the website which helps in delivering a better user experience for the visitors.

No cookies to display.

Advertisement cookies are used to provide visitors with customized advertisements based on the pages you visited previously and to analyze the effectiveness of the ad campaigns.

No cookies to display.

FC2ブログのテンプレートを一部変更のやり方、HTML,CSS

■目次

■概要

まず、FC2ブログのテンプレートの一部を変更したいという場合、
HTMLとCSSをいじっていきます。
ちなみに拒絶反応起こしてしまう方も
実は簡単にできるのでぜひ見てみてください。

一部の変更とは例えば、背景のカラー変えたいな、、、
ここの文字もっと大きくしたい、この幅広くしたい
などと元あるテンプレートを使っていると
誰しも思ったことはあると思います。

今日はそのやり方を簡単に説明してきます。
 

■変更するにあたってあると便利なもの

google chrome(ブラウザ)

これがあるとほんとにわかりやすいです。
持ってない方はインストールしてもいいかもしれません。


■進め方


FC2ブログのテンプレートを開きます。
FC2ブログの管理画面を開く
設定の項目からテンプレートの設定を開く
※今回はPCのみでの変更になります。
その画面でスクロールしていただくとHTML編集とスタイルシート編集という
二つの項目が出てきます。
これがHTMLとCSSになります。
今回はブラウザのChromeを使ってやっていきますが
なくてもできます。

Chromeの場合

Chromeで自分の変更したいブログサイトを表示させます。
(普通の管理画面とかじゃなくて普通のブログ画面)
そして右上の縦に3つ並んでいるボタンを押して
その他のツールからデベロッパーツールを起動させます。
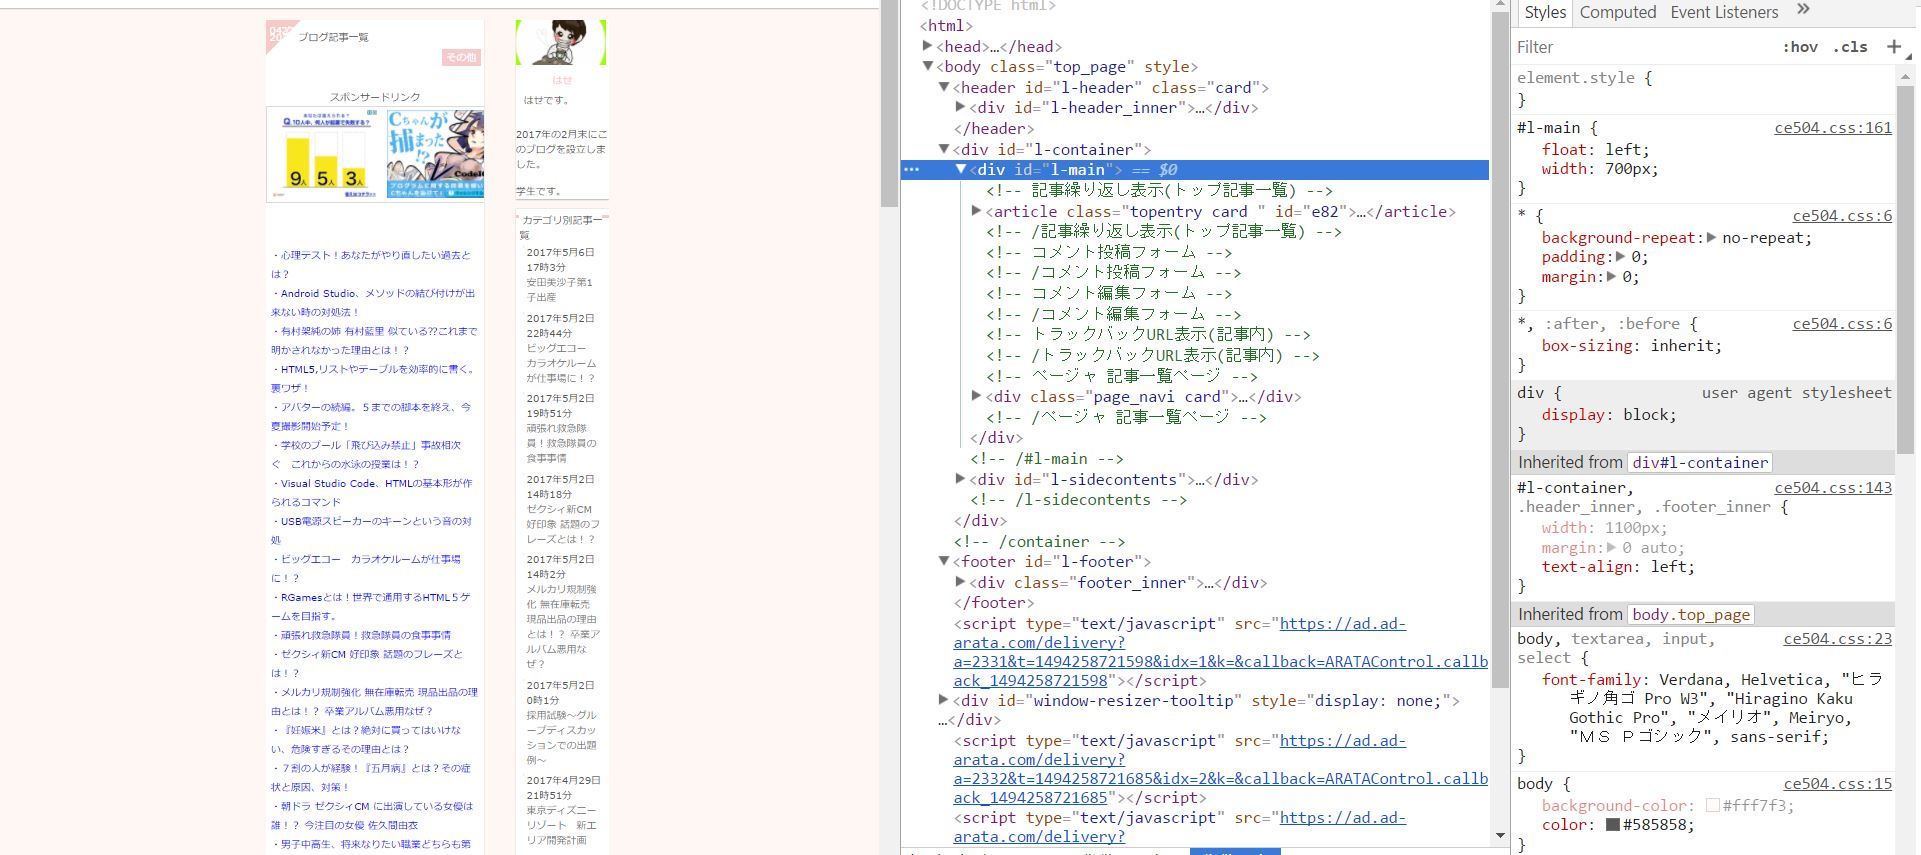
するとこのブログ内のHTMLとCSSが表示されます。
キャプチaャ
するとこのような感じで出てきます。
これでHTMLをクリックすると
それがどこかを教えてくれます。
大変わかりやすいです。
そして自分が変更したいところが指定されたとき
そのHTMLを二度クリックするとCSSもそこの位置に移動してきてくれます。
テンプレートによって異なりますが、おそらく8割9割はCSSでほとんど
色や配置など指定してると思いますので
CSSを変更していきます。
例えば一番バックの色を変更したいときはそちらは
ほぼbodyのCSSをいじればいいので
そのCSSのbackground-color:色;といった感じです。
ちなみにこちらのブラウザでも変更可能です!!
ですが実際に反映されることはないです。
ただのプレビューみたいなものです。
もしもそのレイアウトで気に入ったら
そちらをコピーやメモをとって
実際にコードを変えてみましょう。
 
今回は詳しい内容まではやりませんでした。
取り敢えず、どう変えるかはまた次回やりますが、
今回は どこを変えるか!これがわかってくれればうれしいです。

コメント

スポンサーリンク
スポンサーリンク
タイトルとURLをコピーしました