
前記事で、JWTの実装イメージを記しました。
今回は、PHPとReactでJWTを使用して認証処理を実装しました。
本実装は、あくまで検証を目的としているのであらかじめご了承ください。
以下省略しています。
- 認証サーバを持たせていない
- 公開鍵・秘密鍵の保管場所
- 秘密鍵をパスワードで保護していない
- ロジック(なるべくファイルをまとめた)
- バリデーションやCookieのオプションなどセキュリティ対策
- mySqlLite使用
環境
- PHP 7.4
- Firebase PHP JWT
- RS256(署名アルゴリズム)
- React 18.2
- Axios 1.6.2
- Material-UI
- mySqLite
- MAMP
Reactのパッケージは、他に以下を追加しました。
- @emotion/react
- @emotion/styled
-
react-router-dom
フォルダ構成
フロントエンド
必要なフォルダ/ファイル以外は省略しました。
#React

└── src
    ├── App.js
    ├── index.js
    ├── pages
        ├── index.jsx
        └── mypage.jsx
バックエンド
#PHP
.
├── App
│   ├── auth.php
│   ├── cookie.php
│   ├── db.php
│   ├── login.php
│   └── regist.php
├── composer.json
├── composer.lock
├── index.php
├── mySqLite.db
├── private_key.pem
├── public_key.pem
フロントエンドを実装した
パッケージのインストール
Reactのインストール
お好みでtsxをお使いください。(本記事ではjsxです。)
npx create-react-app app
Material-UI、Emotionのインストール
UIを整形するために使用します。(なくても良いです。)
npm install @mui/material @emotion/react @emotion/styled
react-router-dom、axiosのインストール
ページ、画面遷移、非同期通信処理のため以下を追加します。
npm install react-router-dom axios
App.js
React用のルーティングライブラリのreact-router-domのRouterを使用して、2ページ作成します。
ルートページ「/」にて、会員登録/ログイン機能を実装し、マイページ「/mypage」を認証ユーザページとします。
import React from 'react';
import { BrowserRouter as Router, Route, Routes } from 'react-router-dom';
import Index from './pages/index';
import Mypage from './pages/mypage';
const App = () => {
  return (
    <Router>
      <Routes>
        <Route path="/" element={<Index />} />
        <Route path="/mypage" element={<Mypage />} />
      </Routes>
    </Router>
   );
}
export default App;
index.jsx
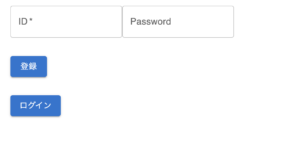
Material-UIを使用して、フォームを実装しています。
axiosにて、サーバサイドにHTTPリクエストを行います。
バリデーションは省略しています。
サーバサイドでルーティングを実装していないため、各処理のリクエストは、
クエリーのtypeによって分岐させています。
ログイン:login、登録:regist
- 登録・ログインにおいて、非同期でサーバサイドにHTTPリクエストを実行をします。適切なURLを指定してください。
import React, { useState, useEffect } from 'react';
import axios from 'axios';
import { useNavigate } from 'react-router-dom';
import Button from '@mui/material/Button';
import TextField from '@mui/material/TextField';
import Box from '@mui/material/Box';
const Index = () => {
  const navigate = useNavigate();
  const [id, setId] = useState('');
  const [password, setPassword] = useState('');

  const regist = () => {
    const type = "regist";
    sendUserData({ id, password, type })
      .then((result) => {
        if (!result) throw new Error('不明なエラーが発生しました。');
        if (result['CODE'] !== 1) throw new Error(result['MESSAGE']);
        alert('登録が完了しました。')
      })
      .catch((error) => {
        alert(error.message)
      });
  }
  const login = () => {
    const type = "login";
    sendUserData({ id, password, type })
      .then((result) => {
        if (!result) throw new Error('不明なエラーが発生しました。');
        if (result['CODE'] !== 1) throw new Error(result['MESSAGE']);
        navigate('/mypage');
      })
      .catch((error) => {
        alert(error.message)
      });
  }
  return (
    <>
      <div>
        <Box p={2}>
          <TextField
            required
            id="outlined-required"
            label="ID"
            value={id}
            onChange={(e) => setId(e.target.value)}
          />
          <TextField
            id="outlined-password-input"
            label="Password"
            type="password"
            autoComplete="current-password"
            value={password}
            onChange={(e) => setPassword(e.target.value)}
          />
        </Box>
        <Box p={2}>
          <Button variant="contained" color="primary" onClick={regist}>
            登録
          </Button>
        </Box>
        <Box p={2}>
          <Button variant="contained" color="primary" onClick={login}>
            ログイン
          </Button>
        </Box>
      </div>
    </>
  )
}
export default Index;

const sendUserData = async ({ id, password, type }) => {
  try {
    const axiosInstance = axios.create({
      withCredentials: true,
    });
    const postData = { 'id': id, 'password': password };
    const response = await axiosInstance.post(`http://localhost/app/?type=${type}`, postData, {
      headers: {
        'Content-Type': 'application/x-www-form-urlencoded'
      },
    });
    return response.data
  } catch (error) {
    return false;
  }
mypage.jsx
前述したクエリーのtypeにて、authを指定しています。
- ロード時の認証において、非同期でサーバサイドにHTTPリクエストを実行をします。適切なURLを指定してください。
import React, { useState, useEffect } from 'react';
import axios from 'axios';

const Mypage = () => {
  const [isAuth, setIsAuth] = useState(false);
  const [userId,setUserId] = useState('');
  useEffect(() => {
    authenticateUser()
      .then((result) => {
        if (!result) throw new Error('不明なエラーが発生しました。');
        if (result['CODE'] !== 1) throw new Error(result['MESSAGE']);
        setIsAuth(true);
        setUserId(result['RESULT']['userid'])
      })
      .catch((error) => {
        setIsAuth(false);
        alert(error.message);
      });
  }, []);
  return (
    <>
      {isAuth ? (
        <>
        <h1>ようこそ {userId} さん</h1>
        </>
      ) : (
        <>
          ログインされていません。
        </>
      )}
    </>
  )
}
export default Mypage;

const authenticateUser = async () => {
  try {
    const axiosInstance = axios.create({
      withCredentials: true,
    });
    const response = await axiosInstance.get(`http://localhost/app/?type=auth`);
    return response.data
  } catch (error) {
    return false;
  }
};
サーバサイドを実装した
php-jwtライブラリのインストール
php-jwtライブラリは、PHP上でJWTを操作できるツールです。
プロジェクトフォルダを開き、composerを使用してインストールします。
composer require firebase/php-jwt
証明書を発行
OpenSSLを使用して、公開鍵と秘密鍵のペアを生成します。
RSAアルゴリズムを使用して秘密鍵を生成します。
・秘密鍵
openssl genpkey -algorithm RSA -out private_key.pem
次に、秘密鍵から公開鍵を作成します。
・公開鍵
openssl rsa -pubout -in private_key.pem -out public_key.pem
データベースを作成 SQLite3
SQLite3をインストールし、データベースを作成します。
sqlite3 mySqLite.db
テーブル、カラムは最小限で構成します。
user テーブル
| id | INTEGER | PRIMARY KEY AUTOINCREMENT |
| userid | TEXT | |
| password | TEXT |
token テーブル
| id | INTEGER |
PRIMARY KEY AUTOINCREMENT
|
| accessToken |
TEXT
|
|
| refreshToken |
TEXT
|
|
| userid |
TEXT
|
FOREIGN KEY
|
composer.json
autoloadを使用するので、以下のように記述します。
{
    "autoload": {
        "psr-4": {
            "App\\":"App/"
        }
    },
    ....省略
}
index.php
- HTTPヘッダにCORSを定義します。
Access-Control-Allow-Originで、フロントエンドのドメインを指定します。
Access-Control-Allow-Credentialsで、異なるオリジンからのクレデンシャル( Cookieなど)を含めるかどうかを指定します。
クライアントから、送信されたクエリーからレスポンス処理を分岐します。
<?php
namespace App;
require_once 'vendor/autoload.php';

use Firebase\JWT\JWT;
use Firebase\JWT\Key;
use App\Login;
use App\Regist;
header('Access-Control-Allow-Origin: http://localhost:3000');
header('Access-Control-Allow-Credentials: true');
header('Access-Control-Allow-Headers: Origin, Content-Type, X-Auth-Token');
header('Access-Control-Allow-Methods: GET, POST');
header('Content-type: application/json; charset=UTF-8');

$actions = [
  'login' => function(){ return(new Login)->userLogin(); },
  'regist' => function(){return(new Regist)->addUser(); },
  'auth' => function(){return(new Login)->authenticateUser();}
];

try {
  if(!isset($_GET['type'])) throw new \Exception('エラーが発生');
  $type = $_GET['type'];
  if (!isset($actions[$type])) throw new \Exception('エラーが発生');

  $result = $actions[$type]();
  echo json_encode($result);
} catch (\Throwable $th) {
  echo json_encode(['RESULT'=>'','MESSAGE'=>$th->getMessage(),'CODE'=>0]);
}
regist.php
useridの重複がなければ、
パスワードは、password_hashを使用してハッシュ化してdbに追加します。
<?php
namespace App;
use App\db;
class Regist {
  public function addUser(){
    if(!isset($_POST['id'])) throw new \Exception('IDを入力してください。');
    if(!isset($_POST['password'])) throw new \Exception('パスワードを入力してください。');
    $userid = $_POST['id'];
    $password = $_POST['password'];

    $db = new db;
    $userCount = $db->getUserCount($userid);
    if ($userCount != 0) throw new \Exception('既にIDが使用されています。');
    $hashPassword = password_hash($password,PASSWORD_DEFAULT);
    $result = $db->mergeIntoUser($userid,$hashPassword);
    return ['RESULT'=>$result,'MESSAGE'=>'','CODE'=>1];
  }
}
?>
login.php
一致するuseridのハッシュ化パスワードと照合し一致すればログイン成功としています。
ログイン成功の後は、アクセストークン/リフレッシュトークンを発行します。
もし発行にも成功したら、アクセストークンをcookieに登録するようレスポンスヘッダーにset-cookieを追加します。
<?php
namespace App;
use App\db;
use App\auth;
use App\cookie;
class Login {
  public function userLogin(){
    if(!isset($_POST['id'])) throw new \Exception('IDを入力してください。');
    if(!isset($_POST['password'])) throw new \Exception('パスワードを入力してください。');

    $userid = $_POST['id'];
    $password = $_POST['password'];

    $db = new db;
    $userData = $db->getUserData($userid);
    if(!$userData) throw new \Exception('ユーザIDまたはパスワードが一致しません。');
    if(!password_verify($password,$userData['password'])) throw new \Exception('ユーザIDまたはパスワードが一致しません。');
    unset($userData["password"]);
    $auth = new auth;
    $access_token = $auth->createAccessToken($userData['userid']);
    $refrash_token = $auth->createRefreshToken($userData['userid']);
    $mergeIntoTokenResult = $db->mergeIntoToken($userData['userid'],$access_token,$refrash_token);
    if(!$mergeIntoTokenResult) throw new \Exception('ログインに失敗しました。');
    $cookie = new cookie;
    $cookie->setAccessToken($access_token);
    return ['RESULT'=>$userData,'MESSAGE'=>'','CODE'=>1];
  }
  public function authenticateUser(){
    $cookie = new cookie;
    $auth = new auth;
    //ユーザログイン状態
    if (!isset($_COOKIE) || !isset($_COOKIE['accessToken'])) throw new \Exception('ログインの有効期限が切れています。');
      $accessToken = $_COOKIE['accessToken'];
      $authResult = $auth->checkAndIssue($accessToken);
      if($authResult['CODE'] != 0){//不正またはリフレッシュトークンの有効期限切れ
         if($authResult['CODE'] == 2){//アクセストークンの再発行
          $cookie->setAccessToken($authResult['RESULT']['accessToken']);//レスポンスヘッダーのset-Cookieにアクセストークンをセットする
        }
      }
      return $authResult;
  }
}
?>
db.php
mySqLiteのdbを開き、当該テーブルがなければ、DDLを実行します。
ユーザ情報を含むuserテーブルと、tokenを管理するtokenテーブルを作成しています。
DMLもまとめて記述しています。
ユーザ情報の取得やトークンの保存など。
<?php

namespace App;

class db
{
  private $dbFile;
  function __construct(){
    $this->dbFile = new \SQLite3('mySqLite.db');
    $this->create();
  }
  function __destruct(){
    ($this->dbFile)->close();
  }

  private function create(){
    $queryUserTable = 'CREATE TABLE IF NOT EXISTS users (
    id INTEGER PRIMARY KEY AUTOINCREMENT,
    userid TEXT,
    password TEXT
    )';
    ($this->dbFile)->exec($queryUserTable);
    $queryTokenTable = 'CREATE TABLE IF NOT EXISTS token (
    id INTEGER PRIMARY KEY AUTOINCREMENT,
    accessToken TEXT,
    refreshToken TEXT,
    userid TEXT,
    FOREIGN KEY(userid) REFERENCES users(userid)
    )';
    ($this->dbFile)->exec($queryTokenTable);
  }

  public function mergeIntoUser($userid, $password){
    $query = ($this->dbFile)->prepare('INSERT INTO users (userid, password) VALUES (:userid, :password)');
    $query->bindValue(':userid', $userid, SQLITE3_TEXT);
    $query->bindValue(':password', $password, SQLITE3_TEXT);
    $result = $query->execute();
    $query->close();
    return $result ? true : false;
  }
  public function getUserCount($userid){
    $query = "SELECT COUNT(*) FROM users WHERE userid = :userid";
    $stmt = ($this->dbFile)->prepare($query);
    $stmt->bindValue(':userid', $userid, SQLITE3_TEXT);
    $result = $stmt->execute();
    $count = $result->fetchArray(SQLITE3_NUM)[0];
    return $count;
  }
  public function getUserData($userid){
    $query = "SELECT * FROM users WHERE userid = :userid";
    $stmt = ($this->dbFile)->prepare($query);
    $stmt->bindValue(':userid', $userid, SQLITE3_TEXT);
    $result = $stmt->execute();
    $userData = $result->fetchArray(SQLITE3_ASSOC);
    return $userData;
  }
  public function mergeIntoToken($userid, $accessToken,$refreshToken){
    $sql = 'INSERT OR REPLACE INTO token (id, accessToken, refreshToken, userid)
    VALUES ((SELECT id FROM token WHERE userid = :userid), :accessToken, :refreshToken, :userid)';
    $query = ($this->dbFile)->prepare($sql);
    $query->bindParam(':userid', $userid);
    $query->bindParam(':accessToken', $accessToken);
    $query->bindParam(':refreshToken', $refreshToken);
    $result = $query->execute();
    $query->close();
    return $result ? true : false;
  }
  public function getTokenData($accessToken){
    $query = "SELECT * FROM token WHERE accessToken = :accessToken";
    $stmt = ($this->dbFile)->prepare($query);
    $stmt->bindValue(':accessToken', $accessToken, SQLITE3_TEXT);
    $result = $stmt->execute();
    $tokenData = $result->fetchArray(SQLITE3_ASSOC);
    return $tokenData;
  }
}
auth.php
ログインで認証されるとアクセストークンやリフレッシュトークンを生成します。
プライベートクレームにuseridを追加、有効期限を30分/30日として、RS256アルゴリズムで生成した秘密鍵にて署名します。
適切に作成されたら、リフレッシュトークン、アクセストークン、ユーザIDをDBに保存します。そして、クライアントへアクセストークンを返します。
アクセス制限のある処理のおいて、クライアントから認証処理のリクエストがあれば、
公開鍵を使用して改ざんや期限切れなどを検査します。
改ざんされていれば、クライアントへ再ログインを要求します。
期限切れであれば、リフレッシュトークンを使用して、アクセストークンの再発行を行います。
期限切れのアクセストークンから、tokenテーブルの一致するレコードを取得してリフレッシュトークンを取得します。デコードをして、useridをセットしたアクセストークンを発行します。
この値を当該レコードにupdateし、クライアントへ返します。
この時、リフレッシュトークンの有効期限が切れていたらクライアントへ再ログインを要求します。
ロジックは、以下記事でまとめています。
https://hasethblog.com/it/programming/dev/7911/#google_vignette
<?php

namespace App;

use Firebase\JWT\JWT;
use Firebase\JWT\Key;
use App\db;

class auth{
  private $header = [
    'alg' => 'RS256',
    'typ' => 'JWT'
  ];
  private $payload = [
    'iss' => 'application',
    'iat' => '',
    'nbf' => '',
    'exp' => '',
    'user_id' => ''
  ];
  private $public_key;
  private $private_key;
  function __construct(){
    $this->public_key = file_get_contents('./public_key.pem');
    $this->private_key =  openssl_pkey_get_private(file_get_contents('./private_key.pem'));
  }

  public function createAccessToken($userid){
    $timestamp = time();
    $thirtyMinutesLater = $timestamp + (30 * 60);
    $this->payload['iat'] = $timestamp;
    $this->payload['nbf'] = $timestamp;
    $this->payload['exp'] = $thirtyMinutesLater;
    $this->payload['userid'] = $userid;
    return JWT::encode($this->payload, $this->private_key, 'RS256', null, $this->header);
  }
  public function createRefreshToken($userid){
    $timestamp = time();
    $thirtyDaysLater = $timestamp + (30 * 24 * 60 * 60);
    $this->payload['iat'] = $timestamp;
    $this->payload['nbf'] = $timestamp;
    $this->payload['exp'] = $thirtyDaysLater;
    $this->payload['userid'] = $userid;
    return JWT::encode($this->payload, $this->private_key, 'RS256', null, $this->header);
  }
  public function checkAndIssue($accessToken){


    // $tokenの値をチェックまたは処理
    try {
      $checkAccessTokenRtn = $this->checkToken($accessToken);
      $accessTokenCode = $checkAccessTokenRtn["CODE"];
      $accessTokenMessage = $checkAccessTokenRtn["MESSAGE"];
      $accessTokenResult = $checkAccessTokenRtn["RESULT"];

      if ($accessTokenCode == 0) throw new \Exception($accessTokenMessage);
      if ($accessTokenCode == 1) { //アクセストークン有効(30分以内) //1
        return ['RESULT' => ['userid' => $accessTokenResult->userid], 'CODE' => 1];
      } elseif ($accessTokenCode == 2) { //期限切れ //2
        //アクセストークンの再発行
        $getRefreshTokenRtn = $this->getRefreshToken($accessToken);
        if ($getRefreshTokenRtn["CODE"] != 1) throw new \Exception($accessTokenMessage); //アクセストークンが無効
        //リフレッシュトークンの有効期限チェック
        $checkRefreshTokenRtn = $this->checkToken($getRefreshTokenRtn["RESULT"]['refreshToken']);
        $refreshTokenCode = $checkRefreshTokenRtn["CODE"];
        $refreshTokenResult = $checkRefreshTokenRtn["RESULT"];
        if ($refreshTokenCode == 0) throw new \Exception($accessTokenMessage);
        if ($refreshTokenCode == 1) { //リフレッシュトークン有効(30日以内)
          //アクセストークンの再発行
          $newAccessToken = $this->createAccessToken($refreshTokenResult->userid);

          //アクセストークン保存
          $updateAccessTokenRtn = $this->updateAccessToken($refreshTokenResult->userid, $newAccessToken,$getRefreshTokenRtn["RESULT"]['refreshToken']);
          if ($updateAccessTokenRtn["CODE"] != 1) {
            throw new \Exception("");
          }
          return ['RESULT' => ['accessToken' => $newAccessToken, 'userid' => $refreshTokenResult->userid], 'CODE' => 2];
        } elseif ($refreshTokenCode == 2) { //期限切れ=>ログイン必要
          throw new \Exception("");
        }
      } else {
        throw new \Exception("");
      }
    } catch (\Exception $e) {
      return ['RESULT' => '', 'CODE' => 0, 'MESSAGE' => $e->getMEssage()];
    }
  }
  //アクセストークンの有効チェック
  private function checkToken($token){
    return $this->verification($token);
  }

  //リフレッシュトークンとユーザIDを返却(一致する)
  private function getRefreshToken($accessToken){
    $db = new db();
    $tokenData = $db->getTokenData($accessToken);
    if ($tokenData) {
      return ['RESULT' => $tokenData, 'CODE' => 1];
    }
    return ['RESULT' => '', 'CODE' => 0];
  }
  private function updateAccessToken($userid, $accessToken,$refreshToken){
    $db = new db();
    $result = $db->mergeIntoToken($userid,$accessToken,$refreshToken);
    if ($result) {
      return ['RESULT' => '', 'CODE' => 1];
    }
    return ['RESULT' => '', 'CODE' => 0];
  }
  //検証
  public function verification($jwt){
    $code = 0;
    $message = '';
    $result = null;
    try {
      $decoded = JWT::decode($jwt, new Key($this->public_key, 'RS256'));
      $currentTimestamp = time();
      if (isset($decoded->exp) && $decoded->exp > $currentTimestamp) {
        $code = 1;
      } else {
        $code = 2;
        $message = 'JWTが期限切れです。';
      }
      $result = $decoded;
    }catch (\Firebase\JWT\BeforeValidException $e) {
      $code = 0;
      $message = 'JWTが有効ではありません。';
    } catch (\Firebase\JWT\ExpiredException $e) {
      $code = 2;
      $message = 'JWTが期限切れです。';
    } catch (\Exception $e) {
      $code = 0;
      $message = 'JWTの検証に失敗しました。';
    }
    return ['RESULT' => $result, 'MESSAGE' => $message, 'CODE' => $code];
  }
}
cookie.php
クッキーの有効期限は、リフレッシュトークンと同じ時間にしました。
リフレッシュトークンより短くすると、リフレッシュトークンの恩恵を受けられず、再ログインのスパンがクッキーの有効期限に依存してしまいます。
Cookieの属性も検証用ですが、XSS対策のため、httponlyはtrueにすることが推奨されます。
<?php
namespace App;
class cookie{
  public function setAccessToken($accessToken){
   setcookie("accessToken", $accessToken, [
      'expires' => time() + (60 * 60) * 24 * 30,
      'path' => '/',
      'domain' => 'localhost',
      'secure' => true,
      'httponly' => true,
      'samesite' => 'None'
    ]);
  }
}
認証処理を試してみた。
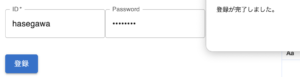
登録処理
まずは、ユーザIDとパスワードを入力してユーザ登録をします。
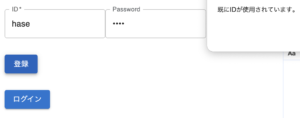
既に登録済みのuseridであれば、登録はできません。
問題がなければ、登録が完了します。
ログイン
先ほどの画面でログインを行います。
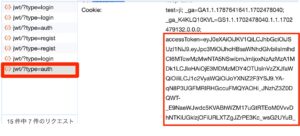
ログインに成功すると、mypageに遷移します。
遷移後の認証リクエストは成功したため、accessTokenがレスポンスヘッダーのset-cookieからが送信されていることがわかります。
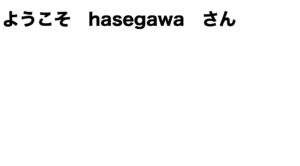
マイページにアクセスすることができました。
30分経過以内であれば同一アクセストークンにてリクエスト※どういつ、
30分経過後は、リフレッシュトークンを使用して、アクセストークンを再発行し使用します。
もしもaccessTokenのクッキーを削除してしまったら、
以下のように、そもそもJWTの検証すら行いません。

補足(注釈事項)
アクセストークンについて
上記では、アクセストークンは30分以内であれば、同一アクセストークンでリクエストと述べましたが、本来アクセストークンのあるべき姿は、使い捨てです。
そのため、有効期間にかかわらず、アクセストークンを使用して認証処理を行ったのであれば、そのアクセストークンは使えなくなります。
リフレッシュトークンについて
推奨ではありますが、リフレッシュトークンも再発行するべきだという場合もあります。
これは、アクセストークンが30分で切れて、そのアクセストークンを再発行に使われた場合です。
おわりに
今回は、JWTを使用した認証処理を実装しました。
これまで、ステートレスの認証処理は実装したことがなかったため、
勉強がてらまとめてみました。
不備やツッコミがあればご指摘いただけると助かります。
(SqLIteは普段は使いません.)


コメント