
今回は、コントローラクラスとサービスクラスの紐付けと実際に受け渡る値をモデルに格納するところを記します。
前回までの章で、会員登録のコントローラとサービスクラスを作成。
さらに、モデルの作成を行いました。
それらの紐付けと、APIにリクエストするために必要なモデルに詰める内容です。
処理の流れ
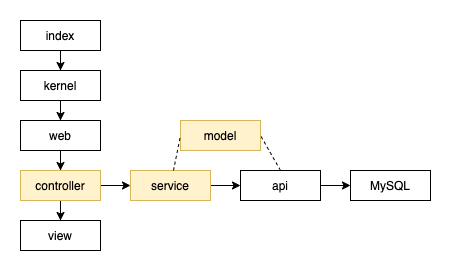
今回は、上の画像の色のついた部分の処理を作成します。
前回までの章でそれぞれのクラスは作成しましたので、今回の記述量はそれほど多くありません。
必要なファイル
今回作成するファイルのみ記しています。
※下記のみだと正常に実行されないのでシリーズの過去記事をご覧ください
sns_training
      └── app
              ├── services
              │         └── userServices
              │                   └── registUserService.php
              ├── controllers
              │              └──registController.php
              └── models
                         ├── inputModels
                         │           └── A00001InputModel.php
                         └── outputModels
                                   └── A00001OutputModel.php
上の構造は、記述するファイルと呼び出されるファイルのみ記してあります。
各ファイルは既に作成済みのものです。今回の章では新規にファイルは作成しません。
registController.php
registController.phpに追記します。
では、会員登録画面を作成してみる。PHPでSNSを作成してみる#09で作成したビューからコントローラへの受け渡しデータをサービスに受け渡し記述を追記しましょう。
<?
namespace App\Controllers;

use App\Services\UserServices\registUserService;
class registController extends controller{
    //@初期表示
    public function index(){
        $model = null;
        $this->View("regist",$model);
    }

    //@会員登録
    public function registPost($request){

      $registUserService = new registUserService;
      $registUserService->request([
        'USER_ID'=>$request['userId']
      ]);

      $this->Json($request);
    }
}
?>
スクラッチでルーティングファイルを作成してみる。PHPでSNSを作成してみる#07
で作成したregistController.phpに追記しました。
上のソースは全述してますが、ご説明は追記部分のみですので、それ以外は#7をご覧ください。
use App\Services\UserServices\registUserService;
ここでは、スクラッチでサービスクラスを作成してみる。PHPでSNSを作成してみる#10で作成したregistUserServiceクラスを宣言しています。
$registUserService = new registUserService;
$registUserService->request([
   'USER_ID'=>$request['userId']
 ]);
registUserServiceというクラスをインスタンス化しています。
そして、親クラスのメソッドであるrequestを呼び出しています。
そして、ビューから受けとった$requestにあるuserIdをオブジェクトに格納します。そのときキー名は、USER_IDとしています。
特に、USER_IDとキー指定する必要はありませんが、内部的に使うキー名なので、SQL等のカラム名と同じにしておくと混乱しなくて済みます。
registUserService.php
スクラッチでサービスクラスを作成してみる。PHPでSNSを作成してみる#10
で作成したregistUserService.phpに追記します。
<?php
namespace App\Services\UserServices;
use App\Services\service;
use App\Models\InputModels\A00001InputModel;
use App\Models\OutputModels\A00001OutputModel;
class registUserService extends service {
    protected $REQUEST_API_NAME;
    public function input($request = null){
      $this->REQUEST_API_NAME = "A00001";
      $a00001 = new A00001InputModel();
      $a00001->USER_NAME = $request['USER_ID'];
      return $a00001;
    }

    public function output($result = null,$request = null){

    }
}
?>
上の内容はファイルの全述内容です。
use App\Models\InputModels\A00001InputModel;
use App\Models\OutputModels\A00001OutputModel;
ここでは、inputとoutputのモデルを宣言しています。
サービスで使用するモデルのみの宣言でよいです。
$this->REQUEST_API_NAME = "A00001";
$a00001 = new A00001InputModel();
$a00001->USER_NAME = $request['USER_ID'];
return $a00001;
クラスのメンバ変数でREQUEST_API_NAMEを宣言していますが、
A00001を代入しています。これは、API番号です。今回は、A00001を使用するのでそのように記述しています。
inputはAPIリクエスト前に通るメソッドです。
モデルについてもinputModelに格納します。
returnでは、値を格納したモデルをrequestメソッドに戻り値として渡します。
outputメソッドについては、apiの返ってきた値を受け取る処理を含むので
api、db処理の作成後に記します。
おわりに
今回の内容は以上です。
プログラミング力は、コードを書けるだけではなく、構成を考え運用保守がしやすい形を整えることも重要です。
それが組織で活きてきます。
企業でIT職に就きたい方、今の会社から不満や市場価値を高めるために
転職を考えている方。
ぜひ、リクナビNEXTをご登録ください。
就活をしなくともオファーによってよい企業と出会えるかもしれません。
ありがとうございました。


コメント